
Mi Lugarcito
React & Mysql 트위터 만들기 - front 편, NEXTJS / REDUX / SAGA /dummy data 만들기 본문
React & Mysql 트위터 만들기 - front 편, NEXTJS / REDUX / SAGA /dummy data 만들기
selene park 2021. 4. 19. 18:47
npm i next@9 //front
npm i react react-dom //front
npm i prop-types// front
npm i eslint -D // front
npm i eslint-plugin-import -D //front
npm i eslint-plugin-react -D // front
npm i eslint-plugin-react-hooks -D //front
npm i antd styled-components @ant-design/icons // front
npm i @ant-design/icons // front
npm i next-redux-wrapper //front
npm i redux//front
npm i react-redux // front
npm i redux-devtools-extension //front
npm i react-slick//front
npm i -D babel-eslint eslint-config-airbnb eslint-plugin-import //front
npm i -D eslint-plugin-react-hooks// front
npm i  -D eslint-plugin-jsx-a11y // front
npm i shortid//front
npm i immer // 불변성 구원자
npm i faker
echarts.apache.org/en/index.html
Apache ECharts
ECharts: A Declarative Framework for Rapid Construction of Web-based Visualization You are welcomed to cite the following paper whenever you use ECharts in your R&D projects, products, research papers, technical reports, news reports, books, presentations,
echarts.apache.org
npm trends: Compare NPM package downloads
Which NPM package should you use? Compare NPM package download stats over time. Spot trends, pick the winner.
www.npmtrends.com
  "scripts": {
    "dev": "next -p 3060", // 클라이언트 포트 번호 바꾸고 싶을때
    "build": "next build"
  },
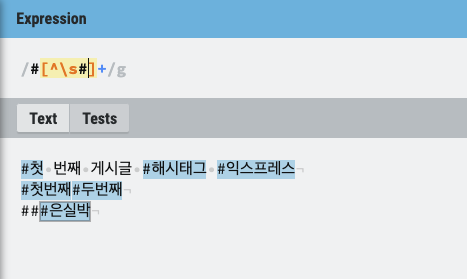
RegExr를 이용해서 해쉬태그 만들기
RegExr: Learn, Build, & Test RegEx
RegExr is an online tool to learn, build, & test Regular Expressions (RegEx / RegExp).
regexr.com
REDUX-THUNK (redux middleware : 리덕스 기능 향상시켜주는 역할) 이해하기
- 지연의 의미, dispatch를 한번에 묶어서 할 수 있게 해준다.
- 비동기 action creator 하나 추가된것
npm i redux-thunk
npm rm redux-thunk//제거하기
export const initialState ={
isLoggedIn:false,
me:null,
signUpDate : {},
loginData : {}
};
//redux-thunk, (비동기 action creator 하나 추가) login 과 관련된 모든 액션 담기
export const loginAction=(data)=>{
return (dispatch, getState)=>{
const state = getState();//initial state
dispatch(loginRequestAction());
axios.post('/api/login')
.then((res)=>{
dispatch(loginSuccessAction(res.data));
})
.catch((err)=>{
dispatch(loginFailureAction(err));
})
}
}
export const loginSuccessAction=(data)=>{
return{
type:'LOG_IN_SUCCESS',
}
}
export const loginFailureAction=()=>{
return{
type:'LOG_OUT_FAILURE',
}
}
//type & data 받기
//reducer 함수 : (이전상태, 액션)=> 다음상태 만들어낸다.
const reducer=(state=initialState, action)=> {
switch(action.type){
case 'LOG_IN_SUCCESS':
return{
...state,
isLoggedIn : true,
me:action.data
}
case 'LOG_OUT_FAILURE':
return{
...state,
isLoggedIn : false,
me:null
}
default:
return state;
}
}
export default reducer
SAGA 설치 및 GENERATOR 이해하기
npm i redux-saga //front
npm i next-redux-saga //front
npm i axios // front
- GENERATOR는 중간점인 yield 에서 멈춘다 (중단점이 있는 함수)
사용방법 :

const gen = function*(){

   conlose.log(1);

   yield;

  conlose.log(2);

   yield;

  conlose.log(3);

   yield 4;

}

const generator = gen();

generator.next()
- 항상 effect 앞에서는 yield 붙여주기
- generate 함수, 이벤트 리스너 같은 역할을 한다.
- take? LOG_IN 라는 액션이 실행될때 까지 기다리겠다는뜻
- takeEvery : (while문 대체)안써주면 yield take 함수가 일회용으로 밖에 못쓰인다.
- takeLatest : 동시 로딩중인경우 (2번 서버에 요청보낸경우, 요청은 여러번 들어감) 먼저 보냈던 것의 데이터를 서버로부터의 응답을 취소하는것 (결국은 데이터가 2번 저장되는 꼴)=>벡엔드에 이미 디비가 들어간거라서 새로고침 하면 연달에 요청했던 데이터가 클라이언트한테 보여짐
- throttle : 시간 제한을 두는것. 요청보내는것까지 제한 보내는것
- yield => await과 같다!
- call? 동기함수, loginAPI 리턴될때까지 기다린다.
- put? dispatch 역할
import {all, call, delay, fork, put, take} from 'redux-saga/effects';//항상 effect 앞에서는 yield 붙여주기
import axios from 'axios';

function logInAPI(data){
    return axios.post('/api/login', data)//to server
}


function* logIn(action){//logIn : generate 함수, 이벤트 리스너 같은 역할을 한다.
    try{
        // const result = yield call(logInAPI , action.data);
        yield delay(1000);
        yield put({//put? dispatch 역할
            type: 'LOG_IN_SUCCESS',
            data: result.data
                })
    }catch(err){
        yield put({
            type: 'LOG_IN_FAILURE',
            data: err.response.data
        })
    }
}


function logutAPI(data){
    return axios.post('/api/logout', data)//to server
}

function* logOut(action){//logIn : generate 함수, 이벤트 리스너 같은 역할을 한다.
    try{
        // const result = yield call(logutAPI, action.data);
        yield delay(1000);
        yield put({//put? dispatch 역할
            type: 'LOG_OUT_SUCCESS',
            data: result.data
        })

    }catch(err){
        yield put({
            type: 'LOG_OUT_FAILURE',
            data: err.response.data
        })
    }
}

function addPostAPI(data){
    return axios.post('/api/post', data)//to server
}

function* addPost(action){//logIn : generate 함수, 이벤트 리스너 같은 역할을 한다.
    try{
        // const result = yield call(addPostAPI, action.data);
        yield delay(1000);
        yield put({//put? dispatch 역할
            type: 'ADD_POST_SUCCESS',
            data: result.data
        })

    }catch(err){
        yield put({
            type: 'ADD_POST_FAILURE',
            data: err.response.data
        })
    }
}


//takeEvery (while문 대체)안써주면 yield take 함수가 일회용으로 밖에 못쓰인다.
function* watchLogin(){

     yield takeEvery('LOG_IN_REQUEST', logIn)// take? LOG_IN 라는 액션이 실행될때 까지 기다리겠다는뜻

}

function* watchLogOut(){

      yield takeEvery('LOG_OUT_REQUEST', logOut)

}

function* watchAddPost(){

       yield takeEvery('ADD_POST_REQUEST', addPost)

}


//fork? 비동기 함수 호출, call? 동기 함수 호출
export default function* rootSaga(){
    yield all([//all : 배열로 동시에 실행
        //비동기 액션 watchLogin 넣어주기
        fork(watchLogin),// fork ? 함수를 실행한다는 뜻
        fork(watchLogOut),
        fork(watchAddPost),
    ]);
}
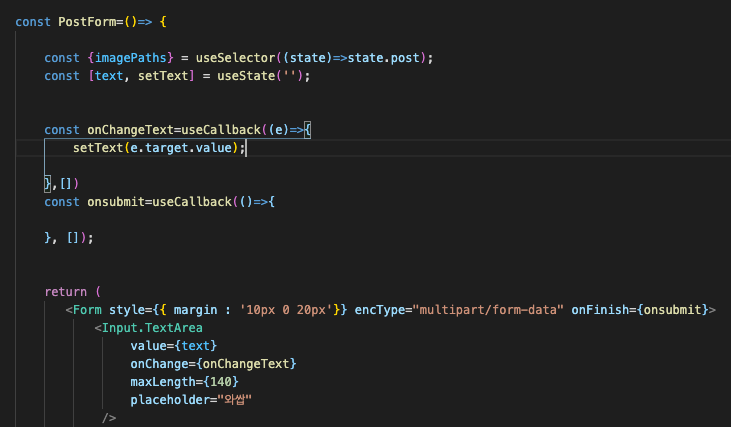
useEffect & useCallback 정리
import React, {useState, useCallback, useRef} from 'react'
import {Button, Form, Input} from 'antd';
import { useDispatch, useSelector } from 'react-redux';
import {addPost} from '../reducers/post';
const PostForm=()=> {
const dispatch=useDispatch();
const imageInput = useRef();// ref? 실제 돔에 접근하기 위해 사용함
const {imagePaths, addPostDone} = useSelector((state)=>state.post);
const [text, setText] = useState('');
//두 번째 인수 배열에 넣은 값들이 바뀔 때 useEffect가 실행된다.
//deps가 없으면 어떤 값이 바뀌든 useEffect는 한번만 실행하고 종료한다는 의
useEffect(() => {
if(addPostDone){
setText('');//다시 깨끗하게 비우기 하는 역할
}
}, [addPostDone])
const onClickImageUpload=useCallback(()=>{
imageInput.current.click();
},[imageInput.current])
const onChangeText=useCallback((e)=>{
setText(e.target.value);
},[])
//이제 addPost 는 함수다@
//useCallback은 함수 자체를 기억해서 렌더링 될 때 함수 자체가 재시작 돼도 함수가 새로 만들어지지 않는다.
const onsubmit=useCallback(()=>{
dispatch(addpost(text));//action name :addPost
//setText('');//다시 깨끗하게 비우기 하는 역할인데...여기가 아니다
}, [text]);//여기서 [text]는 const [text, setText] = useState(''); 를 의미
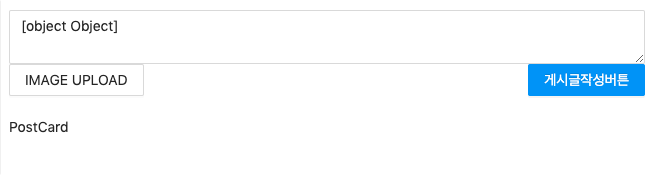
return (
<Form style={{ margin : '10px 0 20px'}} encType="multipart/form-data" onFinish={onsubmit}>
<Input.TextArea
value={text}
onChange={onChangeText}
maxLength={140}
placeholder="와쌉"
/>
<div>
<input type="file" multiple hidden ref={imageInput}/>
<Button onClick={onClickImageUpload}>IMAGE UPLOAD</Button>
<Button type="primary" style={{ float: 'right' }} htmlType="submit">게시글작성버튼</Button>
</div>
<div>
{imagePaths.map((v)=>(
<div key={v} style={{ display:'inline-block' }}>
<img src={v} style={{ width:'200px'}} alt={v}/>
<div>
<Button>REMOVE</Button>
</div>
</div>
))}
</div>
</Form>
)
}
export default PostForm
.eslint
{
    "parser" : "babel-eslint",
    "parserOptions": {
        "ecmaVersion": 2020,
        "sourceType": "module",
        "ecmaFeatures": {
            "jsx" : true
        }
     },
     "env":{
         "browser": true,
         "node" : true,
         "es6":true
     },
     "extends": [
         "airbnb"
     ],
     "plugins": [
         "import",
         "react-hooks"
     ],
     "rules": {
        "jsx-a11y/label-has-associated-control": "off",
        "jsx-a11y/anchor-is-valid": "off",
        "no-console": "off",
        "no-underscore-dangle": "off",
        "react/forbid-prop-types": "off",
        "react/jsx-filename-extension": "off",
        "react/jsx-one-expression-per-line": "off",
        "object-curly-newline": "off",
        "linebreak-style": "off",
        "no-param-reassign": "off"
      }
}
dummy data 아이디 겹치지 않고 사용하는방법
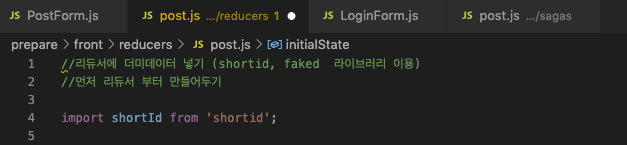
REDUCER -> SAGA-> REDUCER
- 먼저 리듀서 부터 만들어서 더미데이터 넣기 (shortid, faked 라이브러리 이용)
- state 담당, 화면바꾸는것
- 대문자는 서버에서 주는 애들, id가 고유하게 붙어있다.
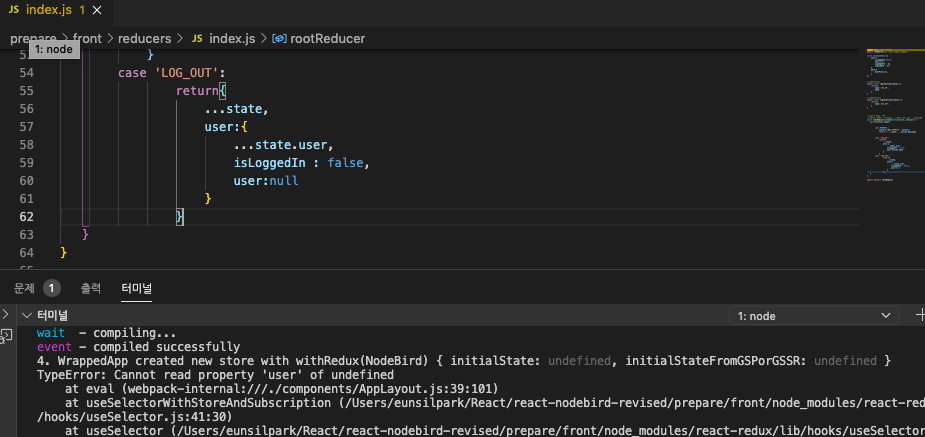
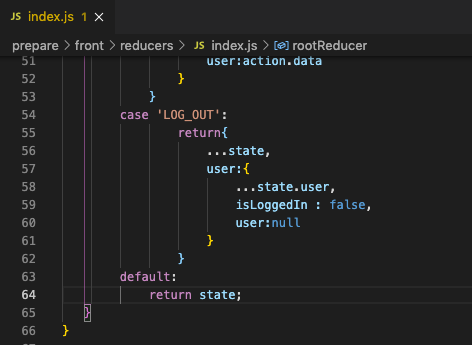
- 화면에 문제가 생긴다면 데이터 (Reducers -> switch 데이터!!) 를 먼저 확인하기
- 중요! reducer 상태를 변경시킬땐? 상태는 액션을 통해 변경이 가능하다. 액션을 만들어 주면 된다. (즉, reducer 에서 액션을 만들고, saga에서 액션을 호출하면된다.)
- REDUCER ACTIONS 들이 각각 REDUCT DEVTOOLS 에 기록이 남아 디버깅할때 편하다
- REDUCER : 이전상태를 액션을 통해 다음 상태로 만들어내는 함수(단, 불변성은 지키면서)
//reducer에 있는 actions들이 reducer로부터 request call 호출되면 ->
//요청받은 데이터 혹은 더미데이터 등 해당 데이터를 가지고 request 액션이 saga (코드 순서대로 실행됨!!!!) 로 간다->
//success면?-> 백엔드 요청후->서버로부터 응답받은 데이터를 saga에서 받고->
//reduder 에서 state 변경!
//reducer 에서 적어놨던 해당 액션 요청들이 리덕스 개발자 툴에서 실행 과정을 알 수 있다.
불변성 구원자 : immer
const reducer=(state=initialState, action)=> {
    return produce(state,(draft) =>{
        switch(action.type){

            case ADD_POST_REQUEST:
                draft.addPostLoading = true;
                draft.addPostDone=false;
                draft.addPostError=null;
                break;

            case ADD_POST_SUCCESS:
                draft.addPostLoading = false;
                draft.addPostDone=true;
                draft.mainPosts.unshift(dummyPost(action.data));//dummyPost를 앞에다 추가해야 최신게시글이 위로 올라감
                break;

            case ADD_POST_FAILURE:
                draft.addPostLoading = false;
                draft.addPostError=action.error;
                break;

            case REMOVE_POST_REQUEST:
                draft.removePostLoading = true;
                draft.removePostDone=false;
                draft.removePostError=null;
                break;

            case REMOVE_POST_SUCCESS:
                draft.removePostLoading=false;
                draft.mainPosts = draft.mainPosts.filter((v)=>v.id !==action.data);
                draft.removePostDone=true;
                break;


            case REMOVE_POST_FAILURE:
                draft.removePostLoading=false;
                draft.removePostError=action.error;
                break;

            case ADD_COMMENT_REQUEST:
                draft.addCommentLoading=true;
                draft.addCommentDone=false;
                draft.addCommentError=null;
                break;

            //불변성 유지하기.....
            case ADD_COMMENT_SUCCESS:{

                const post = draft.mainPosts.find((v)=>v.id === action.data.postId);
                post.Comments.unshift(dummyComment(action.data.content));

                draft.addCommentLoading=false;
                draft.addCommentLoading=true;
                break;


               // 즉,  action.data.content, postId, userId

               //index 먼저 찾기
            //    const postIndex=state.mainPosts.findIndex((v)=>v.id === action.data.postId);
            //    const post = {...state.mainPosts[postIndex]}//새로운객체
            //    post.Comments = [dummyComment(action.data.content), ...post.Comments];
            //    const mainPosts = [...state.mainPosts];
            //    mainPosts[postIndex] =post


            //     return{
            //         ...state,
            //         mainPosts,
            //         addCommentLoading:false,
            //         addCommentDone:true
            //     }
            }

            case ADD_COMMENT_FAILURE:{
                draft.addCommentLoading=false;
                draft.addCommentError=action.error;
                break;
            }

            default:
                break;
       }
    })
}
더미 데이터 : faker
initialState.mainPosts.concat(
    Array(20).fill().map((v,i)=>({

    }))
)


//여기서 map((v,))=>({}) 이렇게 쓰는 이유..?
Redux Toolkit | Redux Toolkit
The official, opinionated, batteries-included toolset for efficient Redux development
redux-toolkit.js.org
무한스크롤 구현하기
scrollY : 얼마나 내렸는지
clientHeight: 화면 보이는 길이
scrollHeight : 총길이
import React, { useEffect } from 'react';
import { useDispatch, useSelector } from 'react-redux';
import AppLayout from '../components/AppLayout';
import PostForm from '../components/PostForm';
import PostCard from '../components/PostCard';
import {LOAD_POSTS_REQUEST} from '../reducers/post';

const Home=()=>{

    const dispatch = useDispatch();
    const {me} = useSelector((state)=>state.user)
    const {mainPosts, hasMorePosts, loadPostsLoading} = useSelector((state)=>state.post)

    useEffect(() => {
        dispatch({
            type:LOAD_POSTS_REQUEST,
        })
    }, []);

    //스크롤 내린후 몇개정도 까지 갔을때 재로딩
    useEffect(() => {
        function onScroll(){
           // console.log(window.scrollY, document.documentElement.clientHeight, document.documentElement.scrollHeight);
            if(window.scrollY+document.documentElement.clientHeight > document.documentElement.scrollHeight -300){

                if(hasMorePosts && !loadPostsLoading){//request 한번만 보내기 위해서 이렇게 처리
                    dispatch({
                        type:LOAD_POSTS_REQUEST,
                    });
                }


            }
        }
        window.addEventListener('scroll',onScroll);

        //중요,useEffect에서  window의 이벤트 리스너 사용시 항상 리턴 꼭 해줘야한다.
        return()=>{
            window.removeEventListener('scroll',onScroll);//안해주면 메모리 쌓인다
        }

    }, [hasMorePosts, loadPostsLoading])


    return(
        <AppLayout>
           {me && <PostForm/>}
           {mainPosts.map((post)=> <PostCard key={post.id}  post={post}/>)}
        </AppLayout>
    )
}

export default Home;
github.com/bvaughn/react-virtualized
bvaughn/react-virtualized
React components for efficiently rendering large lists and tabular data - bvaughn/react-virtualized
github.com
'React & Next.js' 카테고리의 다른 글
| React & Mysql 트위터 만들기 - backend 편 (0) | 2021.04.21 |
|---|---|
| useEffect & useCallback 정리 (0) | 2021.04.21 |
| React 설명 & HOOK 설명 & Redux 설명 (상태관리 라이브러리) (0) | 2021.04.17 |
| React - Cors Issue & Proxy 설정 (0) | 2021.04.17 |
| React & Nodejs & MongoDB - Blog Setting & Login & Register (프런트 + 백엔드) (0) | 2021.04.17 |


